VPN between StrongSwan and SonicWall
Here's how to create a site-to-site VPN between StrongSwan and SonicWall. This has been tested with Ubuntu 14.04 and StrongSwan 5.1.2, and SonicWall with SonicOS 5.9 at the other end.
Table of Contents
1 Network Topology
In this example, we will route traffic between two networks that are located at different sites. Our example network topology looks like this:
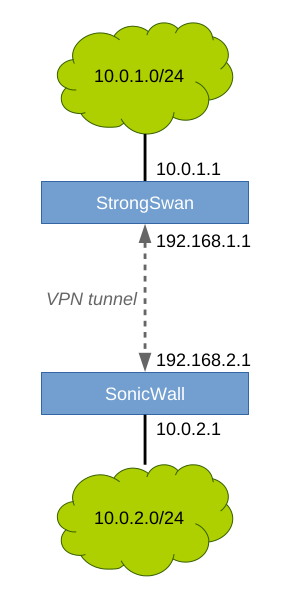
The VPN tunnel will encrypt all traffic between the endpoints. The green networks will be routed to each other through the encrypted tunnel.
2 StrongSwan
2.1 Install
sudo apt-get install strongswan
2.2 Configure
Two files need editing: /etc/ipsec.conf and /etc/ipsec.secrets. The first one is the configuration file, and the second one contains the pre-shared key the endpoints will use to authenticate each other.
2.2.1 /etc/ipsec.conf:
conn sonicwall
  # This server
  left=192.168.1.1
  leftid=192.168.1.1
  # The network behind this server
  leftsourceip=10.0.1.1
  leftsubnet=10.0.1.0/24
  # The remote SonicWall
  right=192.168.2.1
  rightid=192.168.2.1
  # The network behind remote SonicWall
  rightsubnet=10.0.2.0/24
  # Connection parameters
  keyexchange=ikev2
  authby=psk
  ike=aes256-sha1-modp2048
  esp=aes256-sha1-modp2048
  auto=start
We use IKEv2 for key exchange, with AES-256 for encryption and SHA-1 for hashing. A 2048-bit key means Diffie-Hellman group 14. Authentication is done using a pre-shared key. The connection will be started automatically at start.
2.2.2 /etc/ipsec.secrets:
192.168.1.1 192.168.2.1 : PSK "XXXSECRETXXX"
There should be one line per connection in that file. The format, when using pre-shared keys, is this:
local_ip remote_ip : PSK "your password"
Please set your password to a random string.
2.3 Start IPsec Service
To start the service:
sudo service ipsec start
To make it start at boot:
sudo update-rc.d ipsec defaults
To see the status, run:
sudo ipsec statusall
Status of IKE charon daemon (strongSwan 5.1.2, Linux 3.13.0-48-generic, x86_64):
  uptime: 92 seconds, since Apr 04 14:45:29 2015
  malloc: sbrk 2433024, mmap 0, used 351664, free 2081360
  worker threads: 11 of 16 idle, 5/0/0/0 working, job queue: 0/0/0/0, scheduled: 2
  loaded plugins: charon test-vectors aes rc2 sha1 sha2 md4 md5 random nonce x509
  revocation constraints pkcs1 pkcs7 pkcs8 pkcs12 pem openssl xcbc cmac hmac ctr
  ccm gcm attr kernel-netlink resolve socket-default stroke updown eap-identity
  addrblock
Listening IP addresses:
  192.168.1.1
  10.0.1.1
Connections:
   sonicwall:  192.168.1.1...192.168.2.1  IKEv2
   sonicwall:   local:  [192.168.1.1] uses pre-shared key authentication
   sonicwall:   remote: [192.168.2.1] uses pre-shared key authentication
   sonicwall:   child:  10.0.1.0/24 === 10.0.2.0/24 TUNNEL
However, you need to configure the other endpoint first before you will see an active connection and a security association.
3 SonicWall
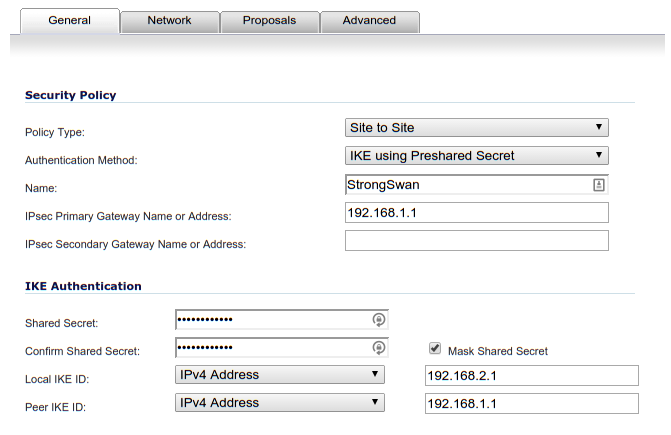
Go to VPN > Settings. Add a new VPN connection.
3.1 VPN Connection > General
The "Shared Secret" field should contain the same random string you put into the /etc/ipsec.secrets file.
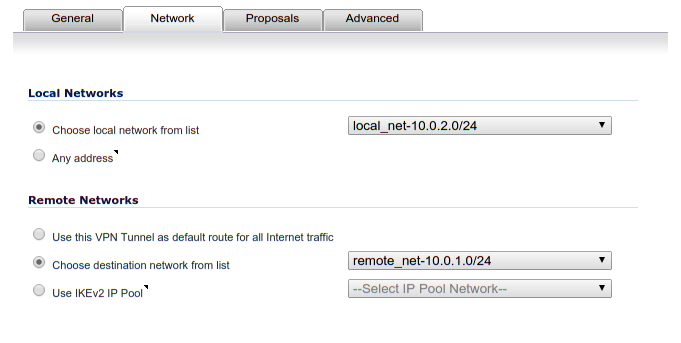
3.2 VPN Connection > Network
The remote network zone should be a "VPN" zone.
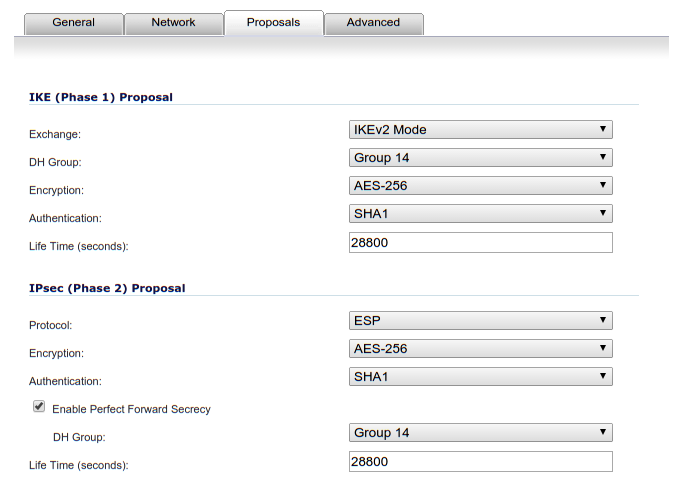
3.3 VPN Connection > Proposals
For the proposal we must match the parameters in /etc/ipsec.conf.
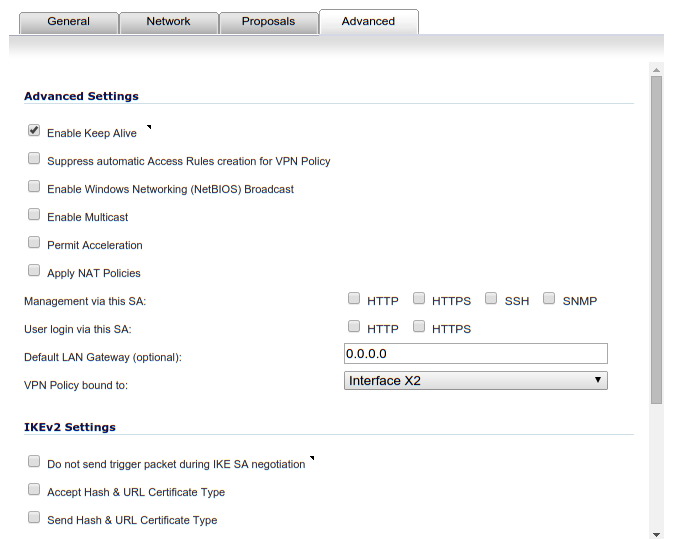
3.4 VPN Connection > Advanced
In the advanced tab I enabled keep-alive.
3.5 Firewall Rules
Also, remember to add firewall rules to allow traffic to flow between networks in SonicWall. Also do the same if you have Iptables in use on the StrongSwan server.
4 Check Status
At this point, the SonicWall should show a green dot on the VPN policy line you created. If not, check the SonicWall log for error messages.
You should also be able to see an active security association on the StrongSwan host with:
sudo ipsec statusall
Status of IKE charon daemon (strongSwan 5.1.2, Linux 3.13.0-48-generic, x86_64):
  uptime: 92 seconds, since Apr 04 14:45:29 2015
  malloc: sbrk 2433024, mmap 0, used 351664, free 2081360
  worker threads: 11 of 16 idle, 5/0/0/0 working, job queue: 0/0/0/0, scheduled: 2
  loaded plugins: charon test-vectors aes rc2 sha1 sha2 md4 md5 random nonce x509
  revocation constraints pkcs1 pkcs7 pkcs8 pkcs12 pem openssl xcbc cmac hmac ctr
  ccm gcm attr kernel-netlink resolve socket-default stroke updown eap-identity
  addrblock
Listening IP addresses:
  192.168.1.1
  10.0.1.1
Connections:
   sonicwall:  192.168.1.1...192.168.2.1  IKEv2
   sonicwall:   local:  [192.168.1.1] uses pre-shared key authentication
   sonicwall:   remote: [192.168.2.1] uses pre-shared key authentication
   sonicwall:   child:  10.0.1.0/24 === 10.0.2.0/24 TUNNEL
Security Associations (1 up, 0 connecting):
   sonicwall[2]: ESTABLISHED 86 seconds ago, 192.168.1.1[192.168.1.1]...192.168.2.1[192.168.2.1]
   sonicwall[2]: IKEv2 SPIs: XXX XXX*, pre-shared key reauthentication in 2 hours
   sonicwall[2]: IKE proposal: AES_CBC_256/HMAC_SHA1_96/PRF_HMAC_SHA1/MODP_2048
   sonicwall{2}:  INSTALLED, TUNNEL, ESP SPIs: XXX XXX
   sonicwall{2}:  AES_CBC_256/HMAC_SHA1_96, 7224 bytes_i (86 pkts, 1s ago), 7224 bytes_o (86 pkts, 1s ago), rekeying in 44 minutes
   sonicwall{2}:   10.0.1.0/24 === 10.0.2.0/24
You can control your tunnel(s) with these commands:
sudo ipsec down sonicwall
sudo ipsec up sonicwall
See log files /var/log/auth.log and /var/log/syslog for log messages.
Comments
💬 Leave a comment